How to Publish on Kindle

You are ready to call yourself a bona fide author with a book title under their name. You look for ways to publish your first book, and Kindle pops as an amazing platform where you can publish your work for free! The thing is, you know not a single thing on how to publish on Kindle, much less self-publish at all!

However, fret not, my dear reader-author, as we are here to guide you to the world of self-publishing in Kindle. We will teach you how to publish on Kindle step-by-step, and give you great tips on how you can drive sales and readerships to your book, from formatting to the nitty-gritty details on your book page.
Prepare Your Manuscript
Of course, the first thing to prepare is your manuscript. The fruit of your labor after months, and maybe even years, your manuscript should be spick and span, void of any form of error.
However, if you are still trying to write your manuscript, then we recommend you read up on how to write a book. Writing your first book can be nerve-wracking and time-consuming, so you should be prepared to take on this journey.

When your manuscript is ready, you now need to format your document for Kindle publication. This includes properly formatting your chapter titles into document headings. Aside from visually identifying the start of a new chapter, formatting chapter titles to headings will help you in navigating through your novel.
Make an Interactive Table of Contents
Making a table of contents for a Kindle ebook may be different than the usual table of contents. Since Kindle dynamically changes the page size of an ebook to fit the device, you don’t need page numbers.
Instead, you should have an interactive table of contents. This means that instead of page numbers, your table of contents should be clickable, and each item should redirect the reader to the section of the novel. If you are writing in Word, you can do this by linking the item in the table to the heading of the chapter. Note that this only works if your chapter titles are formatted as headings, so don’t forget to do this!
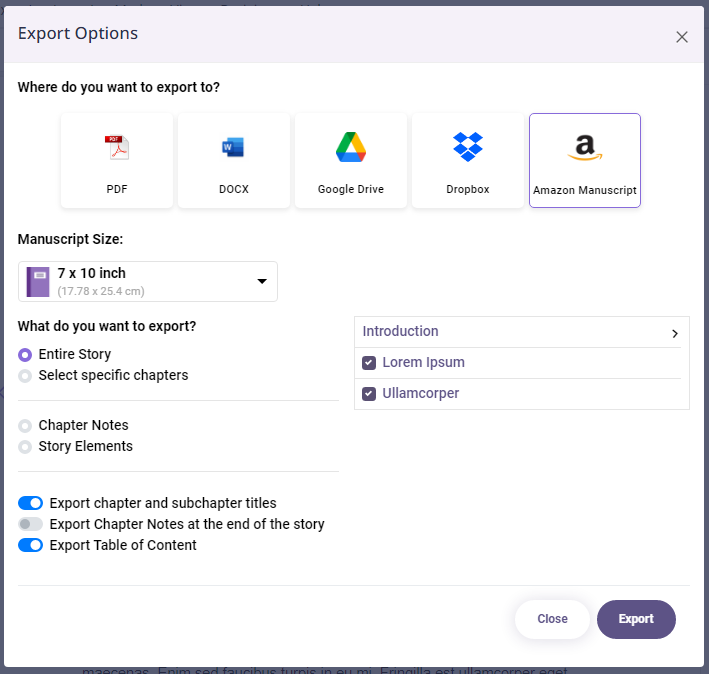
However, if you have been using LivingWriter in writing your manuscript, you don’t need to go through all this manual hassle. LivingWriter supports multiple ways of exporting your work, most importantly supporting the format for Kindle eBooks. With just a few clicks, you can get a professionally formatted Kindle eBook with an interactive table of contents.
Prepare a Stunning Cover Art
“Don’t judge a book by its cover,” as the saying goes, but virtually everyone will give their first impressions on a book based on the cover. Therefore, you should pay special attention to the cover art; it’s the first thing that will capture readers’ attention and can decide if they will bother even reading your book blurb.
If you are terribly inexperienced in image manipulation, you can simply hire a professional artist or designer to make the cover art for you. There are also many websites which offer book cover templates, such as Book Design Templates, or websites like 99designs where you pitch in your book design idea and professional designers send you their designs and you get to choose.
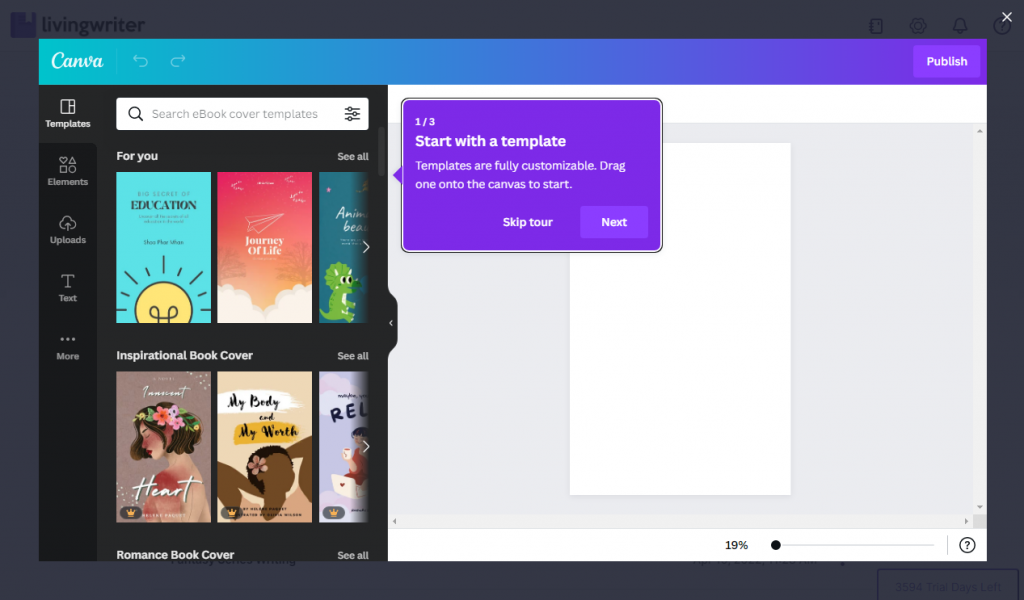
Of course, if you have the skills yourself, you can look no further than LivingWriter for making your cover art. LivingWriter has integrated Canva, a popular graphic design platform, where you can design your own cover art right on LivingWriter. With Canva’s powerful image editing tools and vast number of templates, you can spin up either a mockup of your cover art or your very final art right at Canva!
Publishing to Kindle
Now that you have a manuscript ready for publishing, we can get into the Kindle side of things. We’ll go through each step of the process and guide you along the way.
- First off, we need to sign in to KDP, which is short for Kindle Direct Publishing. If you have an existing Amazon account, you can use the same credentials to log in. If not, you can easily sign up.
- Note that despite having the same credentials, your KDP account and Amazon account are considered to be separate accounts, so you don’t have to worry about any overlap with the accounts.
- Once you’re in the dashboard, you can go right ahead and click the big button that says “Create”. You will be asked to choose among several options for publishing. For now, we’ll choose the Kindle eBook option.
- You will be redirected to the Kindle eBook Details page, where you’ll be providing the following details:
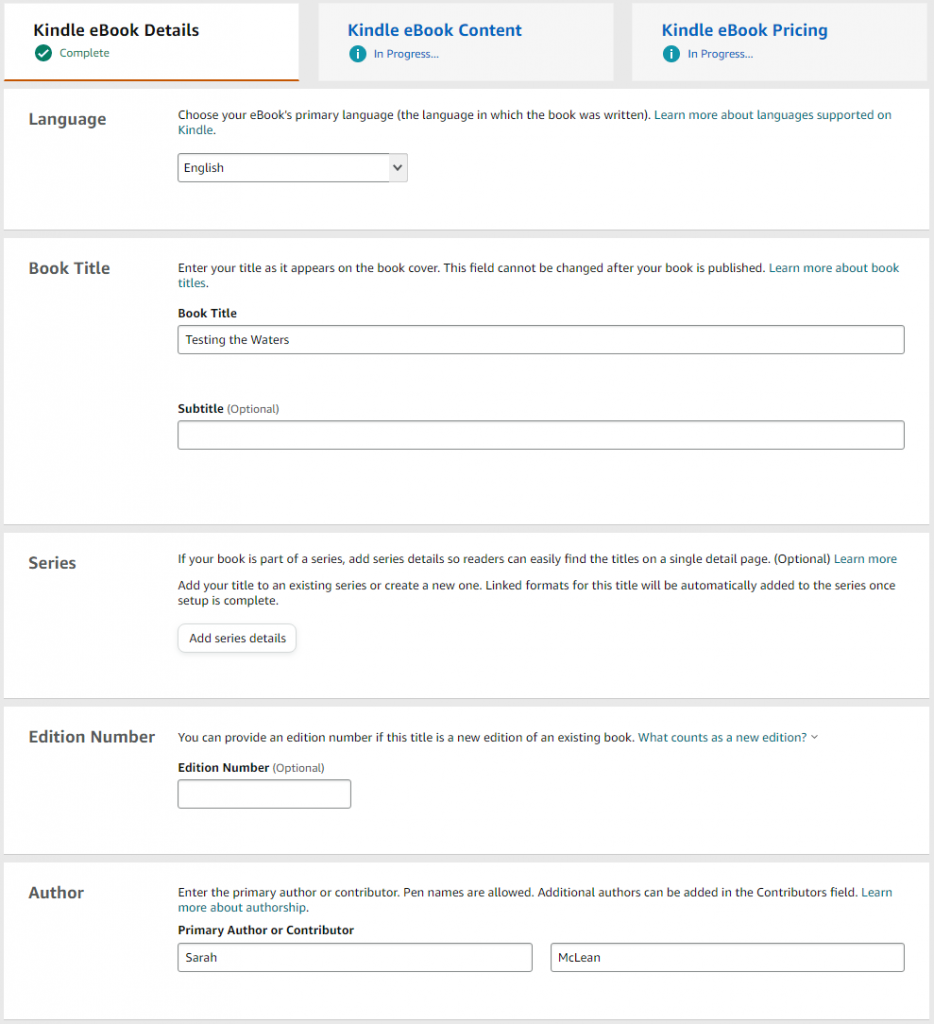
- Language – This is the primary language that your book is written in.
- Book Title and Subtitle – This is, of course, your book title, as well as an optional subtitle. Most authors use this space to give a bit more context about the book, or promote the book through their own achievements, such as being a New York Times Bestseller author.
- Series detail (if applicable) – If your book is part of a series, you can add the details of the series in a popup.
- Edition Number (if applicable) – For your new book, you can simply ignore this field for now.
- Author – This will be the name that will appear on your book details and cover. You can opt to use your real name or use a pen name.
- Contributors – Unless other people significantly contributed or you are co-authoring the novel, you can ignore this section. If you have co-authors, however, you can place them here.
- Description – This is essentially your book blurb, the marketing for your novel. You have 4000 characters to describe and market your books to potential readers, so make sure that you make it count. KDP also allows you to format the description, so you can make use of bold and italics to catch the eye of readers.
- Publishing Rights – For the most part, you will be owning the copyright for your novel.
- Keywords – This is an extension of the book description. In this section, you have to identify at most seven keywords or key phrases that will help customers find your novel easier. You will have to tap into the themes, settings, and genre, among others, of your novel to help you find the best keywords. Alternatively, you can do a bit of research across successful books similar to yours and find the keywords they use. You can also change these keywords anytime, so you can test the waters for some keywords.
- Categories – This is where you choose the genres (maximum of 2) where your book best fits in. This is important as readers will find your book in this category when they browse.
- Age and Grade Range – This will only apply to children’s books for the most part.
- Pre-Order – Kindle gives you the option to either release your book right away or set a release date up to one year from today. We recommend that you choose a different release date so that you can still change up some of the details, plus you can prepare for a promotion plan for your book.
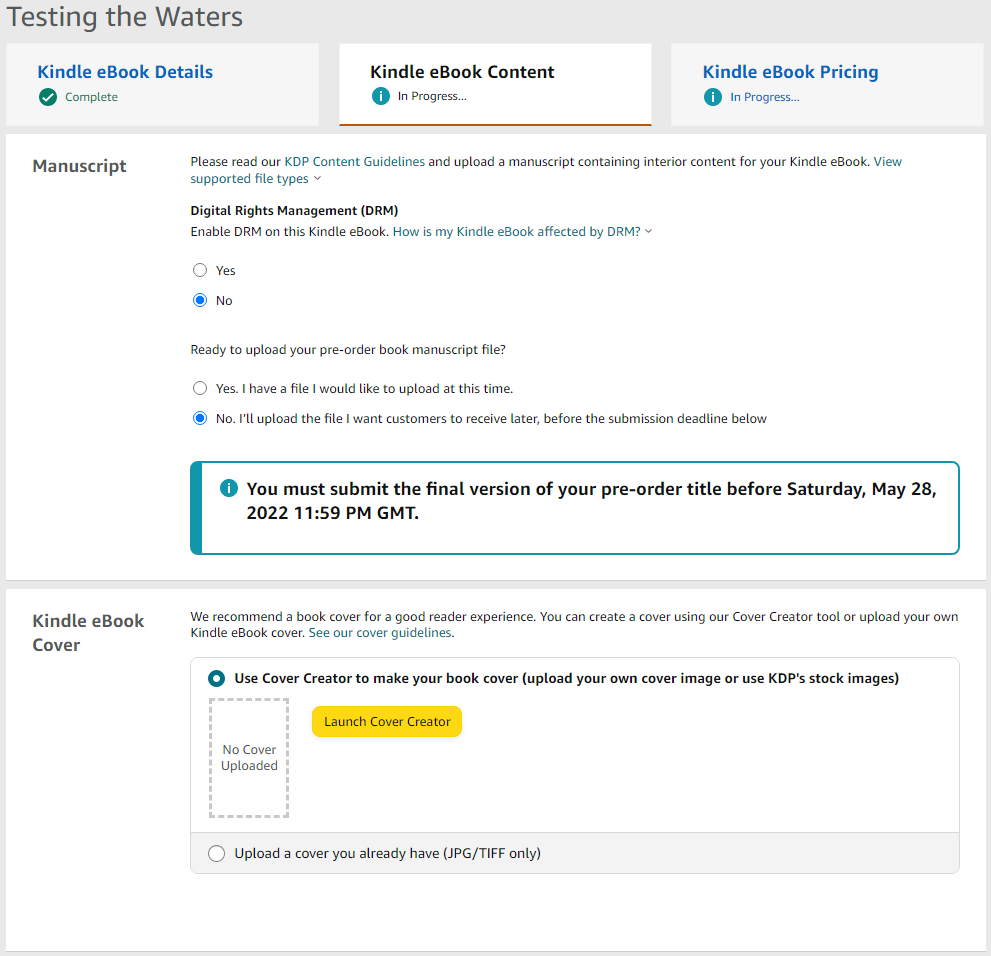
- After entering these details, you will proceed to the Kindle eBook Content page. Here, you will be uploading your manuscript and cover page, as well as be able to preview your eBook through the Online Previewer. We highly encourage you to preview your eBook after you upload the manuscript, so that you can spot errors and mistakes before it gets sent to readers.
- If you opt for a different release date, you can actually upload your manuscript and cover art also on a different date. Kindle gives you a deadline of sorts as to when you can upload your manuscript, which is usually the midnight before your release date.
- Kindle only accepts JPG/TIFF files as cover art files. We recommend at least 2,560 x 1,600 for the resolution of your cover art. You can convey these requirements to your designer, or set these settings when you’re editing your cover art by yourself.
- If you are wondering if you need an ISBN or an International Standard Book Number, Kindle eBooks don’t need one. However, if you have an ISBN for the print edition of your book, you cannot use it for the Kindle edition; you need to buy a new one specifically for the eBook version.
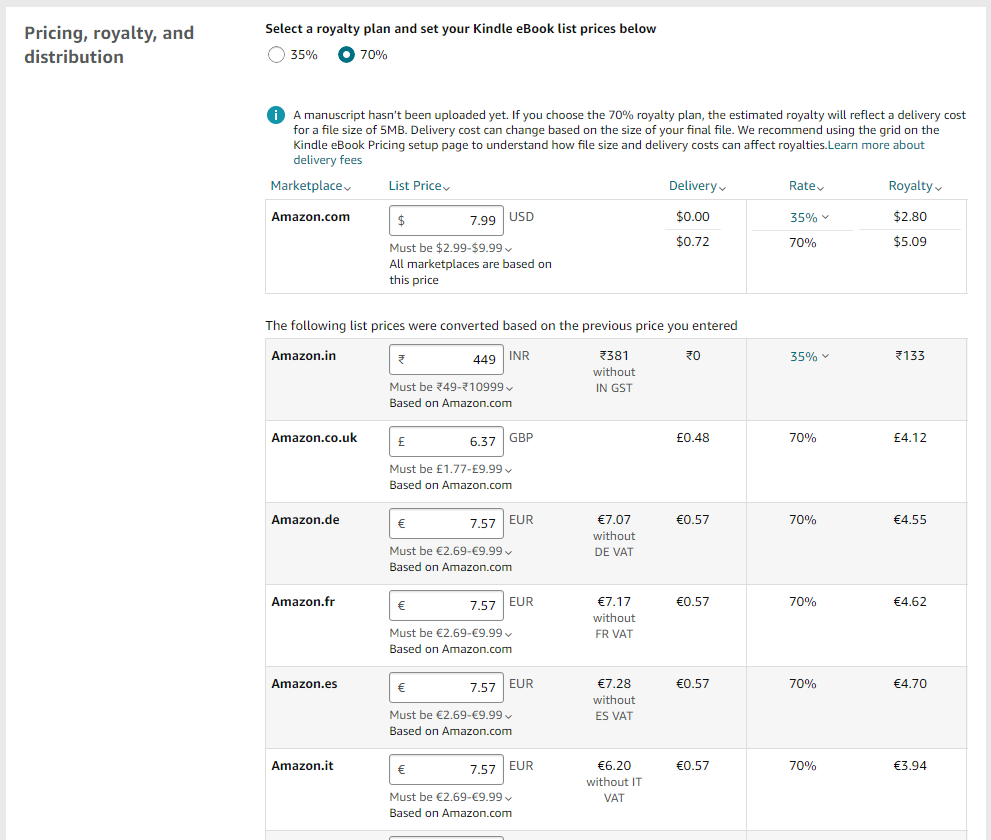
5. When you are done with this, you can proceed to the Kindle eBook Pricing page. Here, you will be dealing with the following details:
- KDP Select – Enrolling in KDP Select means that your book is exclusive only to Amazon for 3 months. This means you can’t sell your eBook to other platforms during this period. In exchange, Amazon will help market your book to their members, and your book will become part of Kindle’s promotions and deals, and even increased royalties in specific areas. The decision for enrolling depends on you and your goals as an author.
- Note: You can opt in KDP Select for the first 3 months then opt out if you want to branch out to other platforms. However, you will have to deselect “Enroll in KDP Select” as the enrolment automatically refreshes.
- Territories and Marketplace – Unless you know what you are doing, you can easily leave this to the default values.
- Pricing, royalty, and distribution – This is where you set your book price and the royalty that you can get. The royalty rate you can choose from is either 35% or 70%. Unless your file is very large, 70% is often the more profitable choice.
- Under the 70% royalty rate, you can price your book from $2.99 to $9.99. For the 35% royalty rate, the maximum price can go up to $200.
- Note: Amazon charges you around $0.15 per MB of the manuscript file, which will be noted under Delivery. You can see how much you’ll be getting per purchase under Royalty. They will also show the price of your book across the other Amazon marketplaces, which are all based on the price you inputted.
- You can now hit that Publish button (or Submit for Pre-Order if you opted for a different release date) and take a deep breath as your novel is now ready to be read by the world.
Publish on Kindle and Be an Author
With finally a published title under your belt, you can proudly say that you are now an author, after toiling for months for your first manuscript. Of course, now you will have to work on your next project, and we recommend that you try LivingWriter if you haven’t yet! Aside from convenient export options that make it easier for you to upload your works to Kindle, LivingWriter packs many powerful features that can help you write your next banger novel.
Try LivingWriter now!